How to install Windows in UEFI mode
From fit-PC wiki
The following procedure refers to installation of Windows 8.1/10, in UEFI mode only!
For installing Windows in Legacy mode please refer to How to install Windows in Legacy mode.
Preparing bootable USB drive
- Download Rufus application from: Rufus
- Connect USB drive to any computer. Make sure to disconnect all other USB mass storage devices.
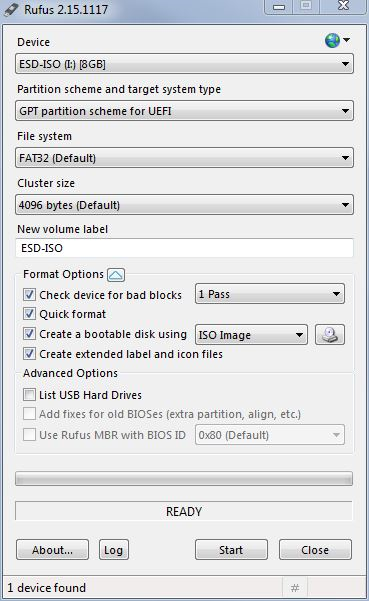
- Run Rufus application and configure it as described in the screenshot:
- Warning! Everything on the destination disk will be overwritten.
- Choose the Windows installation media image:
- Press Start button to proceed.
- Wait until completion.
- Disconnect the USB drive.


Installing Windows on Phoenix BIOS systems
- On the target PC set USB to be the first boot device in the boot order (BIOS defaults).
- Connect the prepared bootable USB drive to the target PC and boot from it.
- Press F5 during boot until the One-Time-Boot menu appears.
- Browse to the Main -> Boot Features menu and set the CSM Support setting to No.
- Press F10 and Yes to save the changes, and Exit.
- Press F5 during boot until the One Time Boot menu appears.
- Choose the USB HDD option from the list of bootable devices.
- Windows installation process will start.
Installing Windows on AMI BIOS systems
Please, perform the following steps for Windows 10 Pro installation on the fitlet2:
1. Prepare a bootable USB drive and boot from it.
- Microsoft's Windows download page:
- Microsoft's Windows 10 Installation media creation tool:
2. Connect the created media to the fitlet2.
3. Power up the fitlet2.
4. Press the F7 key during the BIOS boot until the One Time boot menu appears.
5. Choose the installation media device.
6. The system will boot from the Windows installation media and Windos 10 Installation wizard will start.
7. Follow the on-screen instructions to install the Windows 10 on the fitlet2.