Difference between revisions of "How to install Windows in UEFI mode"
From fit-PC wiki
(Created page with "The procedure refers to Windows 8.1/10 === Preparing bootable USB drive === # Download Rufus application from: [https://rufus.akeo.ie/ Rufus] # Connect USB drive to any comp...") (change visibility) |
|||
| Line 1: | Line 1: | ||
| − | The procedure refers to Windows 8.1/10 | + | '''The procedure refers to Windows 8.1/10''' |
=== Preparing bootable USB drive === | === Preparing bootable USB drive === | ||
| Line 22: | Line 22: | ||
# Choose the USB HDD option from the list of bootable devices. | # Choose the USB HDD option from the list of bootable devices. | ||
# Windows installation process will start. | # Windows installation process will start. | ||
| − | |||
=== Installing Windows on AMI BIOS systems === | === Installing Windows on AMI BIOS systems === | ||
Revision as of 12:20, 14 June 2017
The procedure refers to Windows 8.1/10
Contents
Preparing bootable USB drive
- Download Rufus application from: Rufus
- Connect USB drive to any computer. Make sure to disconnect all other USB mass storage devices.
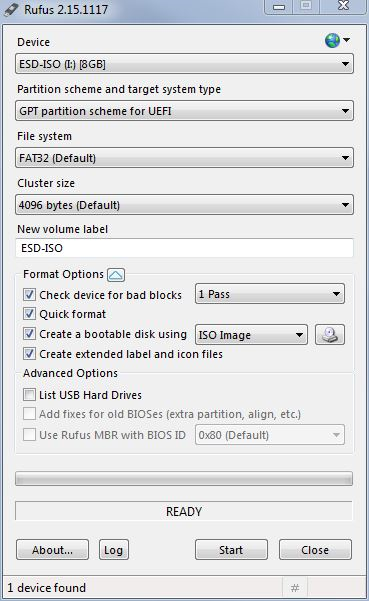
- Run Rufus application and configure it as described in the screenshot:
- Warning! Everything on the destination disk will be overwritten.
- Choose the Windows installation media image:
- Press Start button to proceed.
- Wait until completion.
- Disconnect the USB drive.


Installing Windows on Phoenix BIOS systems
- On the target PC set USB to be the first boot device in the boot order (BIOS defaults).
- Connect the prepared bootable USB drive to the target PC and boot from it.
- Press F5 during boot until the One-Time-Boot menu appears.
- Browse to the Main -> Boot Features menu and set the CSM Support setting to No.
- Press F10 and Yes to save the changes, and Exit.
- Press F5 during boot until the One Time Boot menu appears.
- Choose the USB HDD option from the list of bootable devices.
- Windows installation process will start.
Installing Windows on AMI BIOS systems
Coming soon ...
See also
